Entertain the Possibilities - Home cooking becomes a special occasion; Get recipes, photos, tips and playlists
  • Blog
  • About

7 New Year’s Food Traditions + 1 Crazy-Good Corn Dish

12/30/2016

1 Comment

 
Maque Choux
Maque Choux - sounds like Mock Shoe - a classic Cajun corn dish
I have a feeling we’re all ready for good luck to come our way in 2017. How many of these New Year’s good luck food traditions do you know about – and practice – already? 
​
​1- In the American South it is considered good luck to eat black eye peas on New Year’s Day because the peas resemble coins.

2- Another Southern favorite is stewed greens, representing paper money. Who doesn’t want more of that in the new year?!  

3- Grapes - The Spanish and Portuguese eat twelve grapes as the clock chimes twelve times for midnight, to symbolize the twelve months of the new year.

4- Pork - To some, the pig’s rotundity represents prosperity.  

5- In Greece, when the new year turns, a pomegranate is smashed open to reveal seeds symbolizing prosperity and good fortune. The more seeds, the more luck.

6- Fish are lucky in three ways: their scales resemble coins, they travel in schools, which represents prosperity, and they swim forward, symbolizing progress. 
​
7- In Japan, long buckwheat noodles (soba) symbolize long life, and are therefore lucky—but only if you eat them without chewing or breaking them.

​Source: Bon Appetit
​
We like the Southern good luck charms at our house – peas and greens, please! Here are a few good recipe links if you’d like to treat your taste buds and improve your luck for the New Year: 
  • Hoppin’ John – from Emeril Lagasse via Food Network
  • New Years Southern Style Black Eyed Peas – from Deep South Dish
  • Southern Collard Greens with Smoked Turkey Legs – from Divas Can Cook

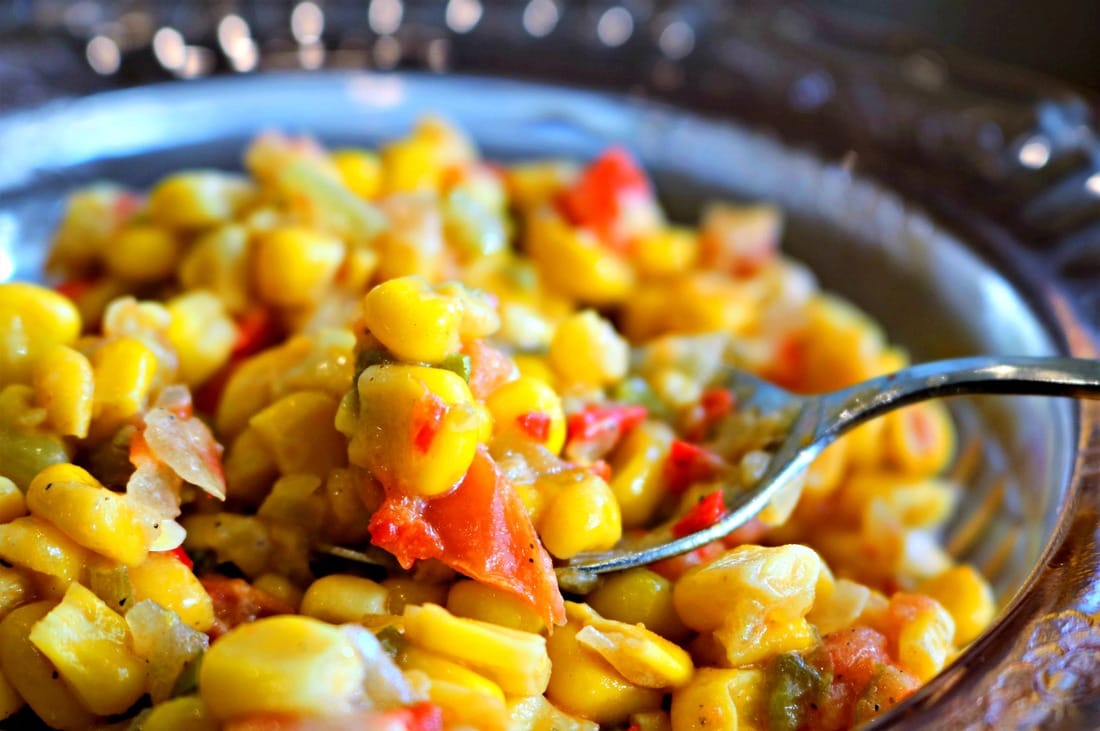
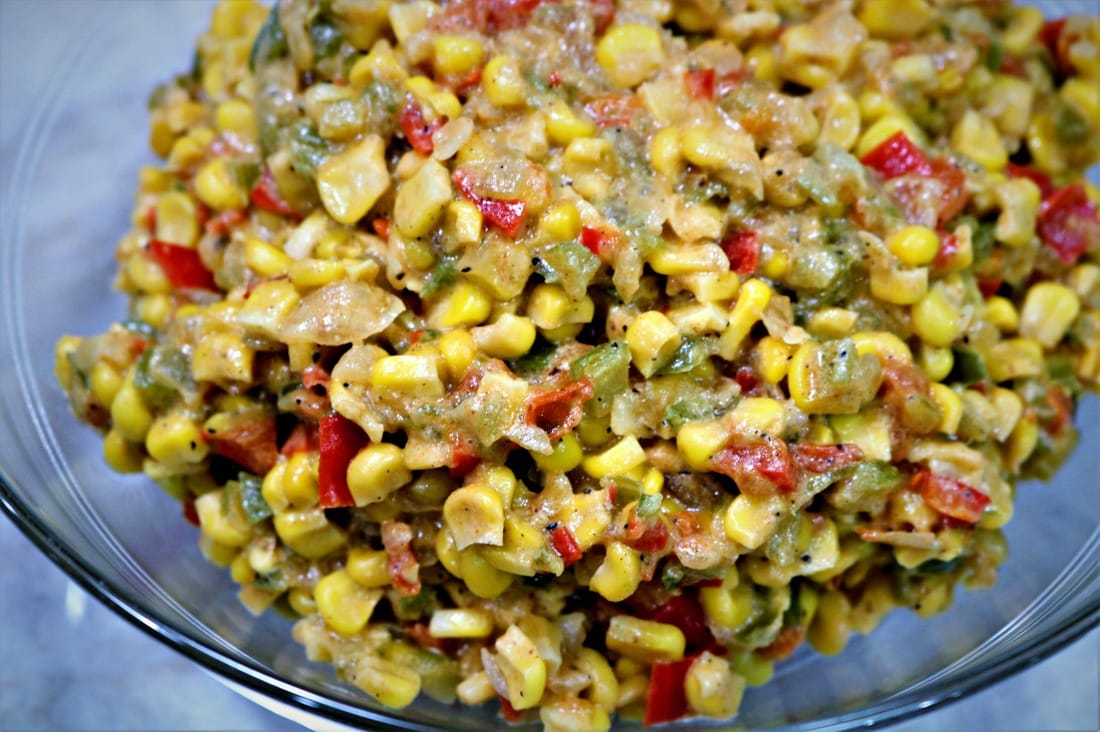
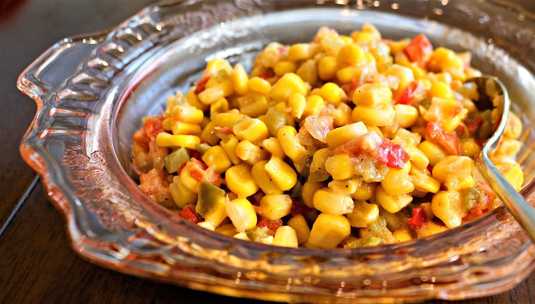
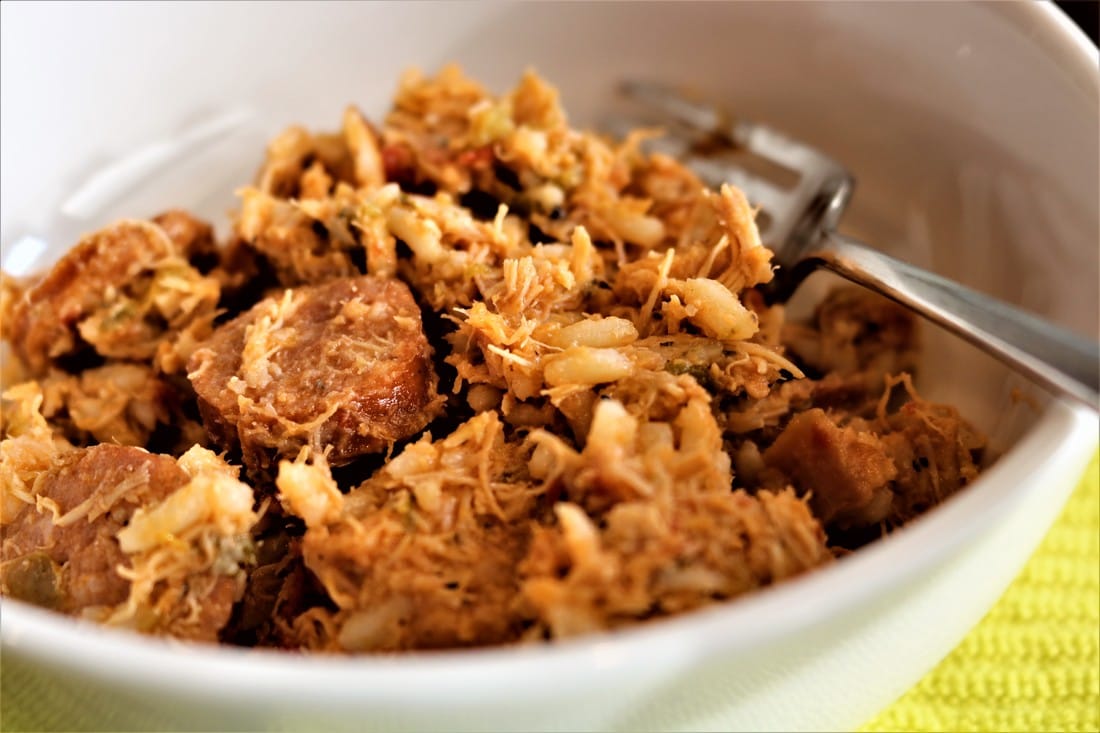
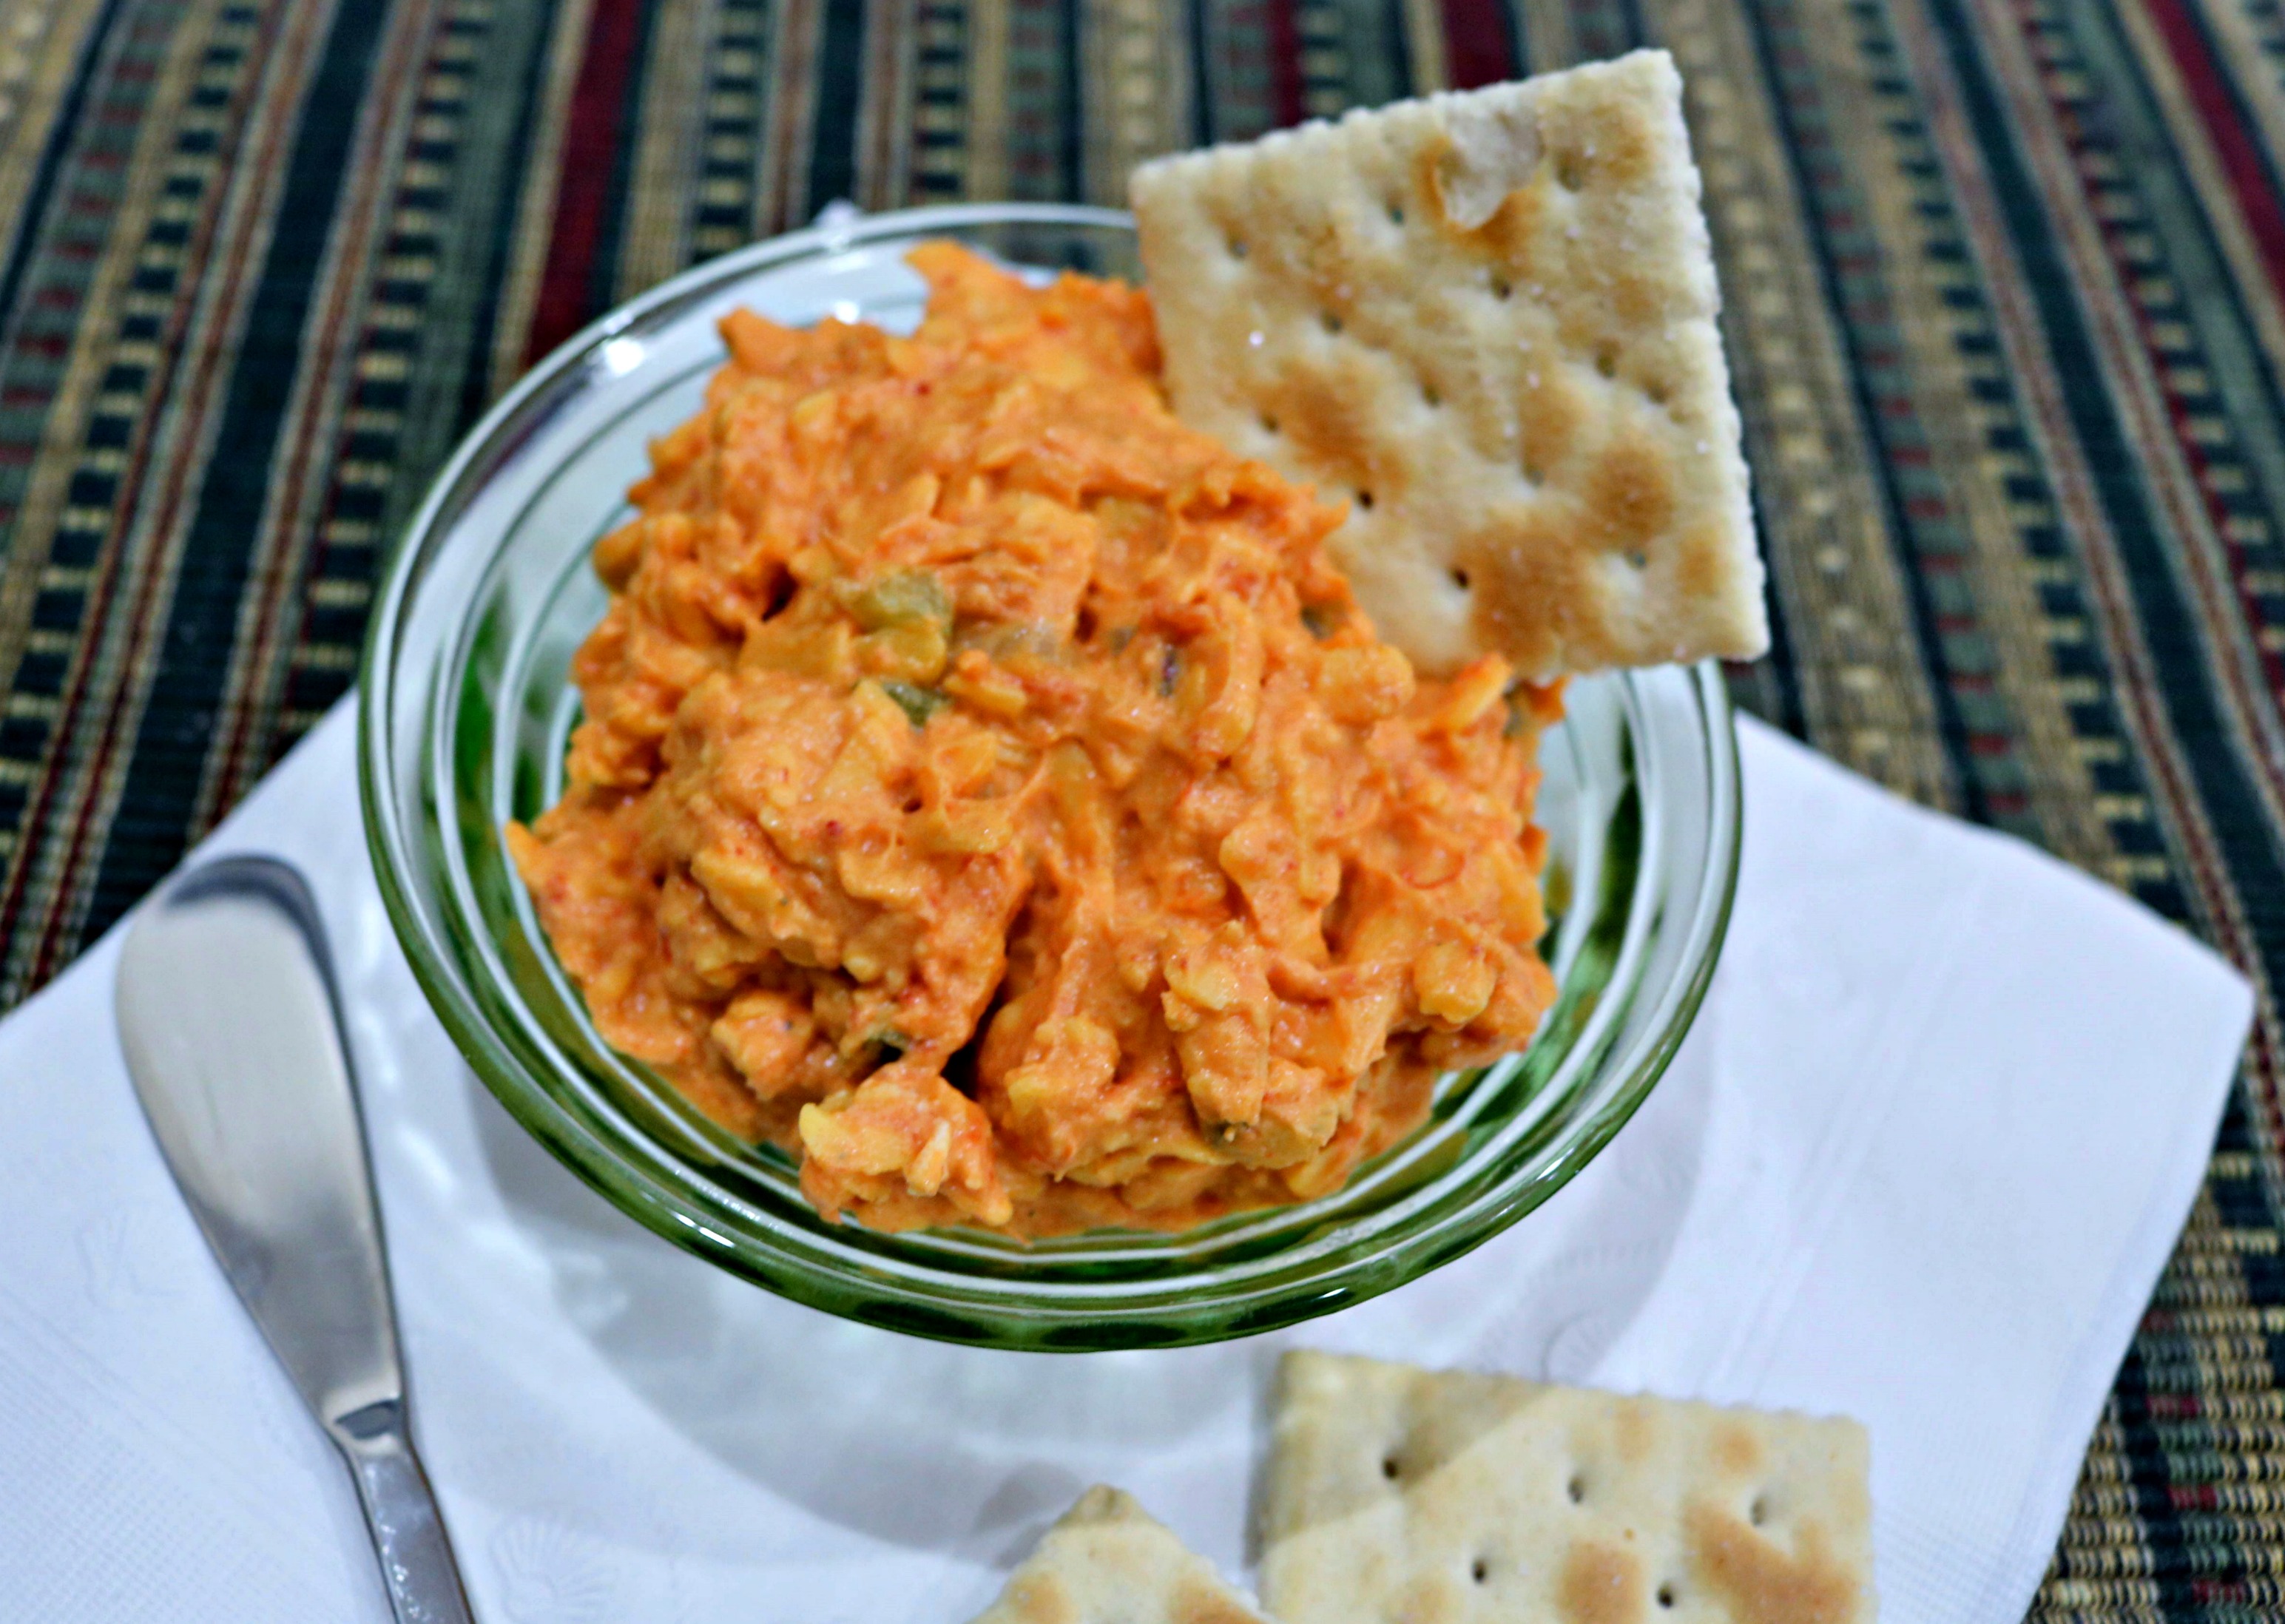
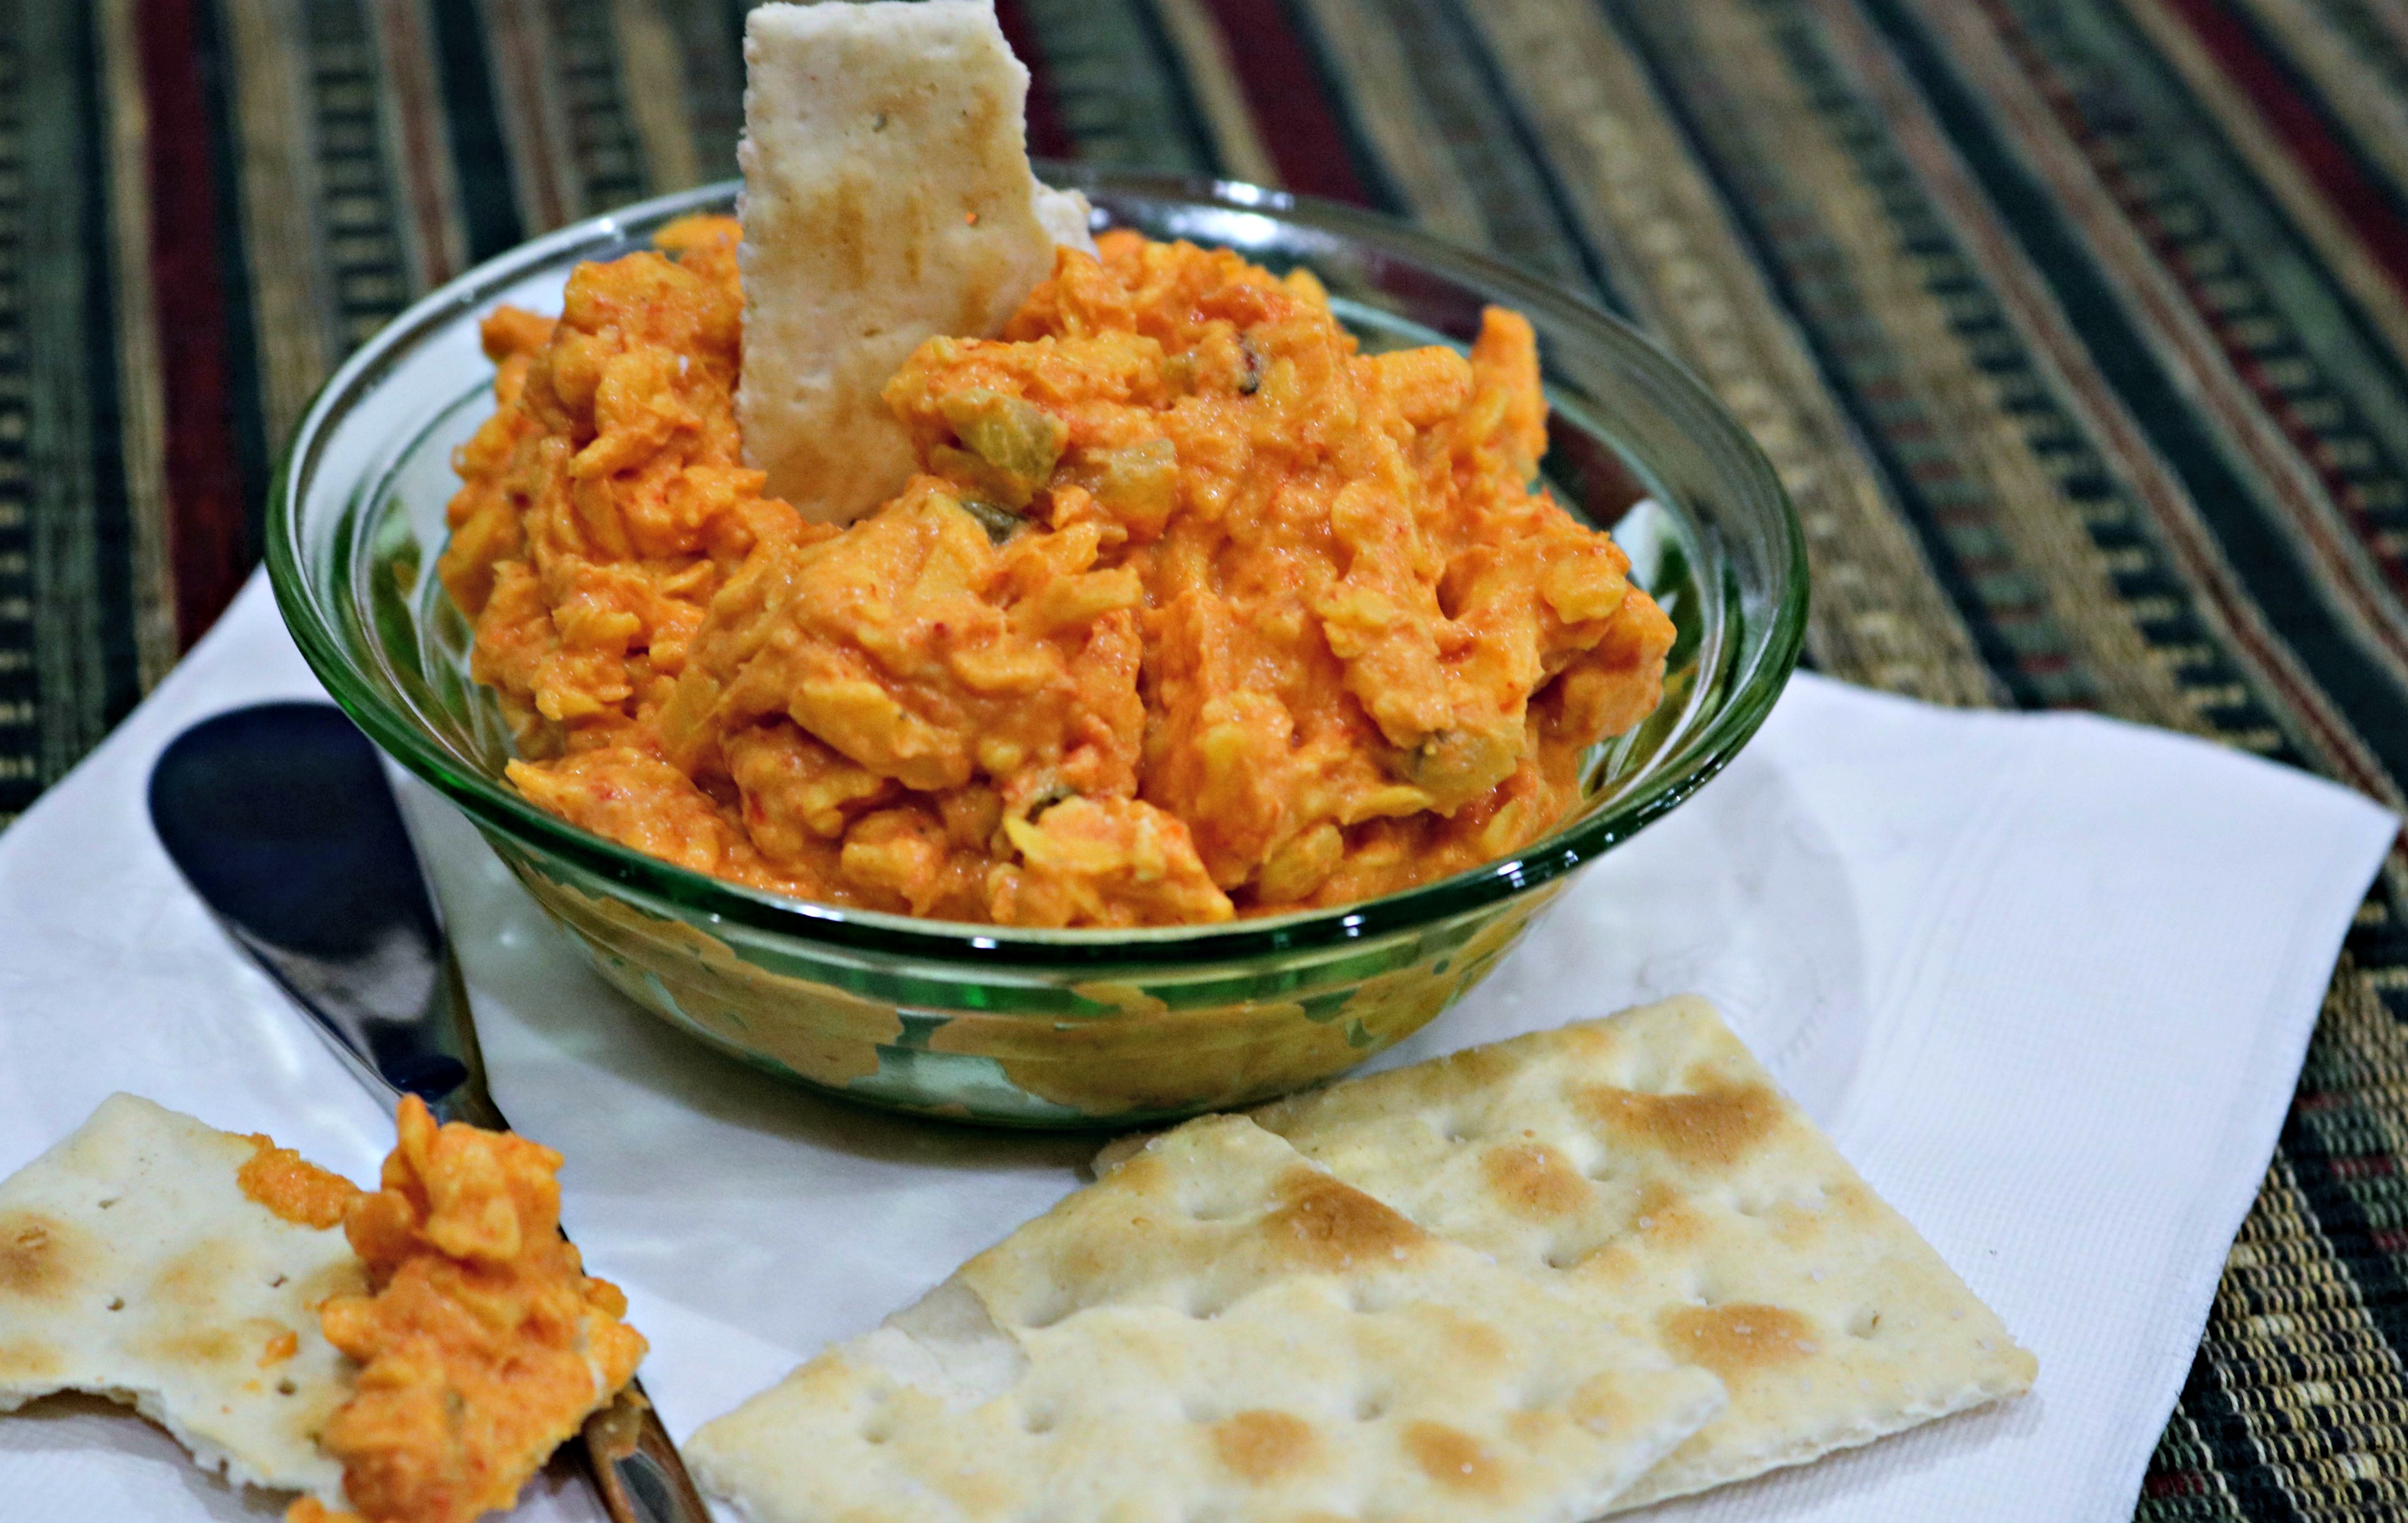
I don’t think this amazing Cajun-style corn dish – Maque Choux (sounds like Mock Shoe) – has any special luck-enhancing properties other than you’ll be lucky to get a taste – it’s that good!

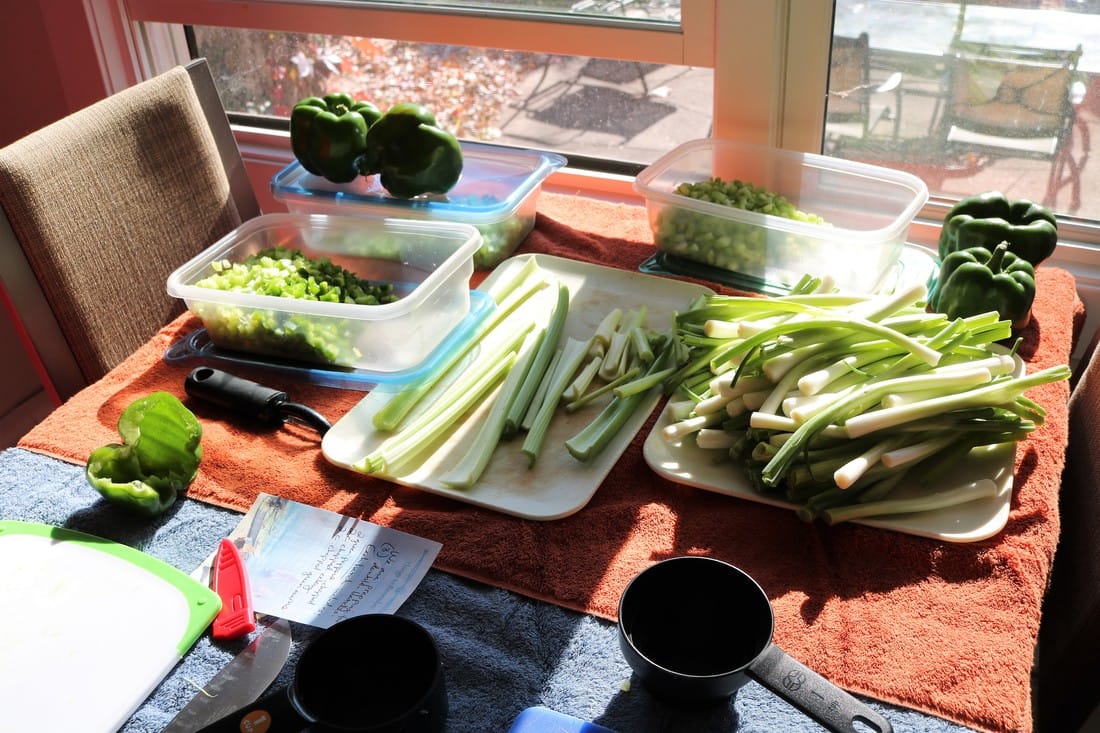
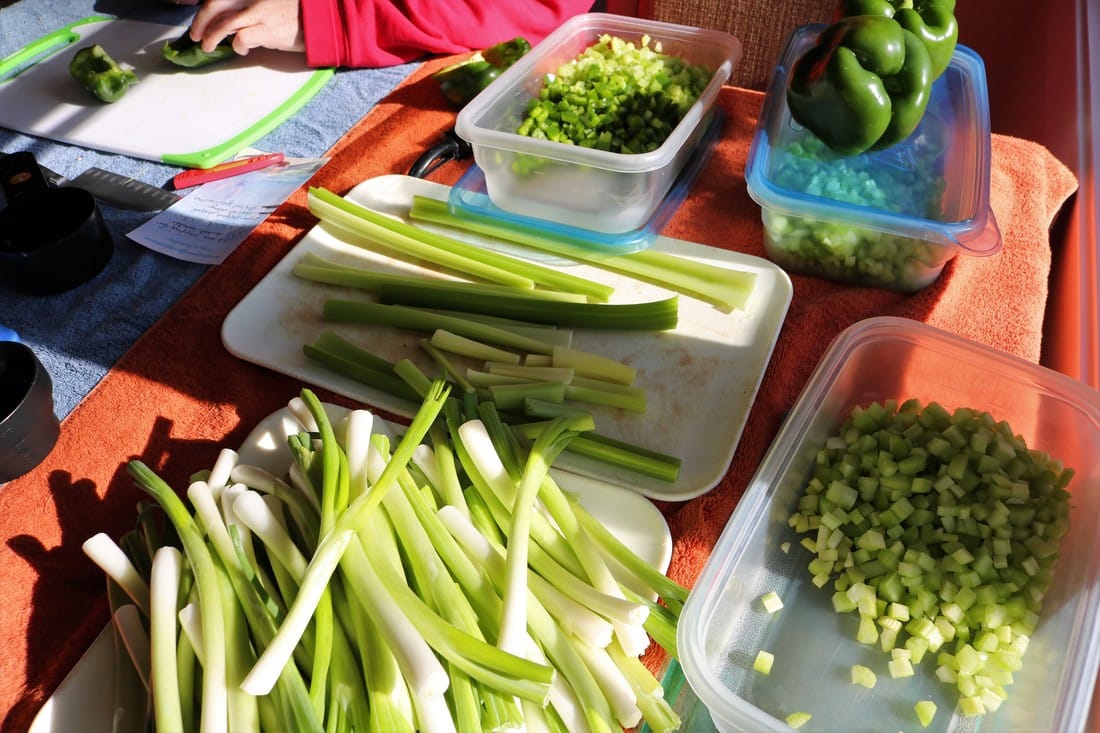
A delicious accompaniment to the other Southern delicacies mentioned above, maque choux blends the flavors and textures of corn, sweet milk, and the traditional Southern ‘trinity’ of celery, bell peppers, and onion. It is frequently made with meat or seafood, but we served this vegetarian version recently as part of a New Orleans inspired menu, receiving kudos and recipe requests. Go on and give a try, then let me know how you like it – I’ll bet that this tasty side dish will become your new good luck charm. 

Click on the photos to enlarge them and read the captions.
Printable Recipe- Maque Choux
File Size: 573 kb
File Type: pdf
Download File

​Maque Choux
Recipe source: The Gumbo Pages
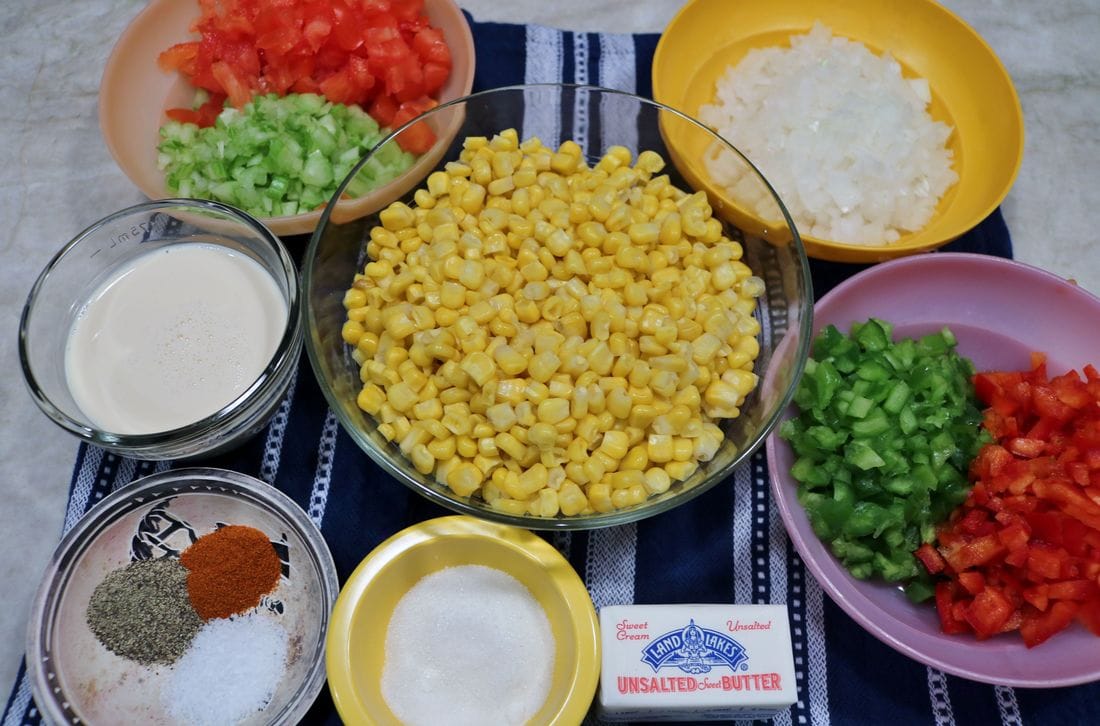
INGREDIENTS:
  • 1 dozen ears fresh sweet corn
NOTE: If you’re making this when fresh corn is out of season, as I was, you can substitute frozen corn. The typical measure is ¾ cup of kernels per ear of corn, so for this recipe you would need about 9 cups of corn.
  • 8 tablespoons (1 stick) unsalted butter
  • 1-1/2 cups onions, finely chopped
  • 1 large green bell pepper, finely chopped
  • 1 large red bell pepper, finely chopped
  • 3 ribs celery, finely chopped
  • 3 large ripe tomatoes, peeled, seeded and roughly chopped
  • 2 teaspoons salt
  • 1 teaspoon cayenne pepper
  • 2 teaspoons freshly ground black pepper
  • 4 tablespoons sugar
  • 1 cup evaporated milk
 
DIRECTIONS:
  • Shuck the corn and remove all of the corn silk. Hold each cob over a bowl and cut the kernels away in layers (don't cut whole kernels), then scrape the knife along the cob to get all of the "milk" out of it.
NOTE: If you’re using frozen corn not off the cob just thaw it in advance and add a splash of milk to the bowl.
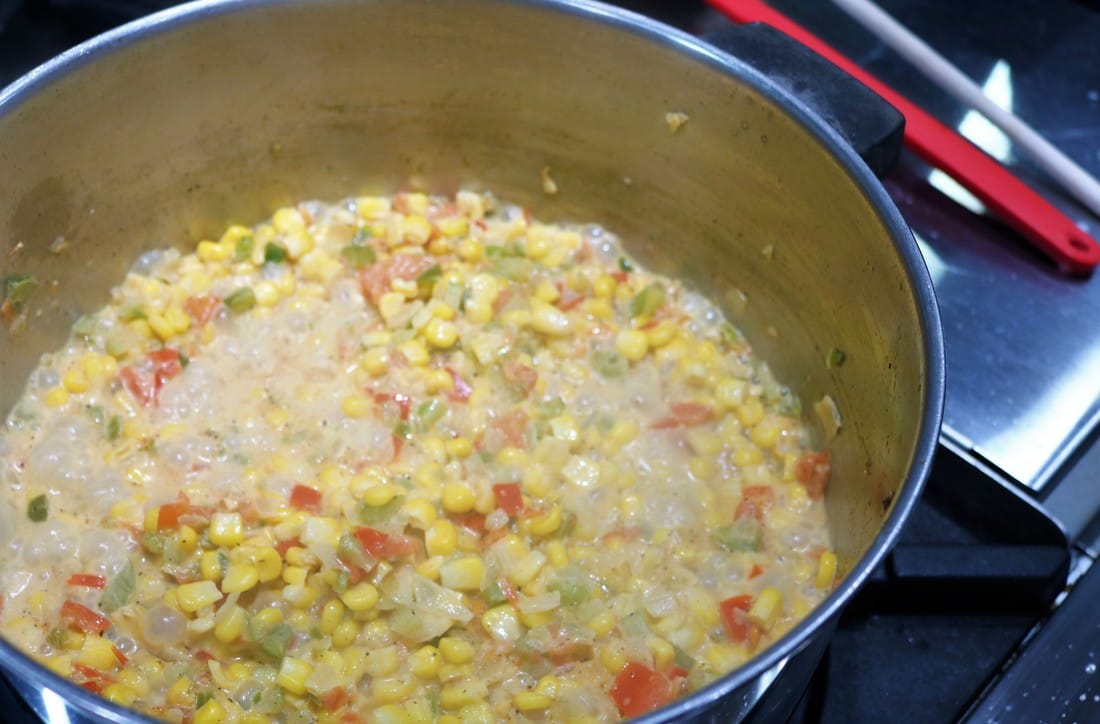
Melt the butter in a large saucepan or pot over medium-high heat.
  • Add the onions, bell peppers, celery and tomatoes and sauté until the onions are transparent, about 10 minutes.
  • Stir in the salt, black pepper and cayenne pepper, then add the corn and milk from the cobs, the sugar and evaporated milk and stir well.
  • Reduce heat to medium and cook until the corn is tender, about 10-15 more minutes. Adjust seasonings to taste.
Serves 8-10
Maque Choux
1 Comment

What’s for Dinner: Jambalaya

12/28/2016

2 Comments

 
Jambalaya with Chicken and Andouille Sausage
The Occasion: Two occasions actually. First, it’s great party food that can be (mostly) made ahead. We served multiple batches at our recent holiday open house where it was enthusiastically devoured.
This flavorful jambalaya is also perfect for a wintertime family meal – with an emphasis on comfort food! Make a big batch for Sunday night supper and enjoy leftovers in your brown bag lunch the next day too.

Why This Works: The recipe comes from the famous Chicago Cajun restaurant Heaven on Seven. That alone should serve as the reason why this works – their New Orleans kitchen cred is real and damn tasty too. The recipe is also pretty easy, once you get past all the chopping during the prep stage.
​
We made this in bulk (3 double-batches – please keep that in mind when looking at the photos) about a month in advance of the party, omitting the rice before freezing the jambalaya in gallon-size freezer bags laid flat to save space. After thawing in the refrigerator, we put the jambalaya back on the stovetop the day before the party to doctor it up by adding cooked rice and adjusting the seasonings.

The Playlist: We’ve lost many great musicians during 2016 including Leon Russell, whose work held great meaning for me in my formative years. Please enjoy his bluegrass interpretation of the Hank Williams classic Jambalaya (on the Bayou).
Click on the photos below to enlarge them and read the captions.
The Verdict: Not the prettiest dish in the world – stew-like bowls of comfort food rarely are – but man oh man those flavors! Really satisfying and very much a winner!

It helps if you love Andouille sausage as much as I do, it’s the dominant flavor. Of course you can dial that up or down by adjusting the balance of proteins: chicken, sausage, and shrimp. I usually omit the shrimp and increase the amount of cluck and oink, but it’s up to you.

You also drive the hotness quotient – add more or less hot sauce and cayenne to suit your taste. I kept it mild for the party and offered bottles of hot sauce nearby for guests to individually calibrate their servings.
​
Of course this dish is a natural for Mardi Gras (Tues Feb 28, 2017) but I think you’ll find it deserves a place in your regular rotation of super-delicious, much-requested big batch meals.
Printable Recipe- Jambalaya
File Size: 563 kb
File Type: pdf
Download File

Jambalaya
Recipe source: Heaven on Seven

INGREDIENTS:
  • ¼ cup canola oil
  • ½ lb. smoked sausage, sliced (such as Andouille)
  • 1 cup chopped onion
  • 1 cup chopped bell pepper
  • 1 cup chopped celery
  • 1 cup chopped green onions
  • 2 cloves garlic, minced
  • 1 16 oz. can tomatoes, drain and reserve the liquid
  • 1 ½ cups chicken stock or water
  • 1 tsp. dried thyme
  • ¼ tsp. cayenne pepper
  • ½ tsp. black pepper
  • 1 tsp. salt
  • 1 cup converted rice
  • 1 ½ tbsp. Worcestershire sauce
  • 2 lbs. peeled shrimp
  • ½ lb. boneless cooked chicken, cubed
NOTE: This is the recipe as written. For my version I eliminated the shrimp and increased quantities of sausage and chicken – 1 lb. sausage and 2 lbs. chicken.
 
DIRECTIONS:
  • In a large heavy Dutch oven, sauté sausage until lightly browned. Remove from pot.
  • Sauté onions, bell peppers, celery, green onions, and garlic in the meat drippings until tender.
  • Add tomatoes, thyme, pepper, and salt. Cook 5 minutes.
  • Stir in rice.
  • Mix together liquid from tomatoes, stock and Worcestershire sauce to equal 2 ½ cups. Add to the mixture in the Dutch oven.
  • Bring to a boil, reduce to a simmer, add raw shrimp, chicken, and sausage and cook uncovered, stirring occasionally for about 30 minutes until rice and shrimp are done.
Note: I made a big batch to freeze ahead for a party. Do not add the rice before freezing as it will break down and become mushy when you thaw it. Instead doctor up the jambalaya after you thaw it by adding cooked rice and a little extra chicken stock if it needs to be ‘loosened up’.
​

jambalaya with Chicken and Andouille Sausage
Let the good times roll! This tasty jambalaya will help get the party started
2 Comments

What’s for Dinner: Potato Latkes

12/27/2016

2 Comments

 
Potato Latkes with Sour Cream
Potato latkes with sour cream and applesauce - crispy and tender, sweet with the sour - yum!
Picture
The Occasion: Happy Hanukkah! Or do you spell it Chanukah? Maybe Hannukah? The Jewish Festival of Lights is celebrated for eight days, this year from sundown on December 24 through January 1st, with nightly menorah lighting, prayers, songs, and fried foods.  Learn more about the joyful holiday here. I’ll share with you our take on the holiday’s most familiar and beloved food tradition – potato latkes. 

​Why This Recipe Works: As in many Jewish families, Ilise and Ina have recipes handed down from generation to generation, from bubbe (grandma) to eema (mother), modified along the way to accommodate for personal preferences, likes and dislikes. Some enjoy their latkes – which are simply fried potato pancakes – large and fluffy, others prefer small and crispy. Some get fancy by adding or substituting veggies – zucchini and sweet potato are popular. Others are latke purists, insisting on nothing but russet potatoes, a little onion, salt and pepper, and the hot hot oil.

For this recipe Ilise adapted a basic recipe with guidance from the veteran latke-makers in our family. It really does take a village! We’re pretty happy with this version which may be made ahead, frozen, and reheated in the oven if that suits your fancy. The alternative – cooking live in the moment – ensures that your house will smell like a deep fryer for at least 12 hours, but sometimes that’s just fine. Another option is to set up an electric fryer on a table outdoors, if the weather cooperates. 

The Playlist: Making latkes is going to take a while. Between the potato shredding and the matzo meal mixing, not to mention the deep frying and splatter-avoidance, you’ll need an energetic playlist to keep you focused and having fun.

​Here’s a good Hanukkah-themed playlist from Spotify. Enjoy!

Please click on the photos below to enlarge them and read the captions.

The Verdict: What’s not to like about super-fresh fried food?  These potato pancakes offered a perfect combination of crispy outer ‘shell’ and tender, melt in your mouth insides. O to the M to the G. So good! Latkes are traditionally served with sour cream and applesauce – and it’s a tradition for a reason! Don’t skip this final step.
​
Is this a labor intensive project? Yes. Is it going to be messy? Mm-hmm. Will there be lingering effects? Oh yes (fried food aroma everywhere + disposing of all that oil). Is it worth it anyway? YOU BETCHA. Special occasions call for special foods and projects – this is a good one. 
Printable Recipe- Potato Latkes
File Size: 562 kb
File Type: pdf
Download File

Potato Latkes
Recipe: Ilise Goldberg with Jan and Allen Lev
 
Yield: Makes 20-28 latkes, depending on size of the pancakes
 
INGREDIENTS:
  • 5 lbs Russet Potatoes, well washed
  • 4 Eggs
  • 1 ¼ Cups chopped Onions, Drained (grate in food processor)
  • 4 Tablespoons Matzo Meal, Panko and/or flour (may add more if too wet, less if too dry)
  • 1-2 Teaspoons Salt
  • 1 Teaspoon Baking Powder
  • ½ Teaspoon ground Black Pepper
  • Pinch Baking Soda
  • Canola Oil for frying
 
DIRECTIONS:
  • Grate potatoes in food processor – no need to peel potatoes.  Cut the potatoes into cubes to prepare for the food processor. 
  • Do all potatoes with the grating disk, and then do half of the grated potatoes with the steel blade.  
  • Drain as much liquid from the potatoes as possible – very important as wet potatoes don’t fry well.  And don’t be surprised that the potatoes first turn pink and then brownish.  They get browned in the cooking process and no one pays that much attention to the fact that they’re not white inside. 
  • In another bowl beat eggs; mix eggs into potatoes, then add onions, salt, baking powder, baking soda and pepper. 
  • Add matzo meal/panko/flour, adjusting the quantity as necessary (see note above).
  • Pour oil into skillet to depth of about 3/4- inch (That way, the pancakes will be covered by the oil and cook better). Heat until hot but not smoking – about 375 degrees. (To test put a small piece of onion in the oil and when it starts to turn brown the oil is hot enough.) 
  • Add batter to skillet with a large spoon (or form the patties in your hand to allow for the ability to squeeze out excess liquid), leaving about 1 inch between each. Flatten slightly with back of spoon. 
  • Cook for 5 to 6 minutes or until crisp and golden, turning with two forks or tongs halfway through.
  • Transfer to paper towels; drain well. Serve hot.
  • To freeze, place on a cookie sheet in single layer and place in freezer.
  • When frozen nice and hard transfer to plastic bags. To bake the latkes from frozen, cook in a 450-500 degree oven for 7 to 10 minutes.
Potato latke with sour cream
Potato latkes: The perfect combination of special occasion/holiday food and soul-satisfying comfort food - Enjoy!
2 Comments

Holiday Shenanigans with a Healthy Dose of Mardi Gras

12/21/2016

3 Comments

 
Holiday Open House with Mardi Gras Flair
I hear you saying “Huh?” and I’ll raise you a “Ho ho ho!”
​
Ilise and I have thrown a large and joyous holiday open house for each of the last 22 years. Lavish spread of homemade food and drinks; festive décor indoors and out; family, neighbors and friends from all aspects of our lives coming together for fun, frivolity, and did we mention the food?! As hosts, we’ve fallen into a sort of formula for how the party goes. Nothing wrong with all that, and in fact it helps to have a proven and replicable game plan.  

One key ingredient for a successful party is a well-calibrated playlist.

Here’s a good one -- holiday-themed as you might expect this time of year -- crafted by awesome music + food blog Turntable Kitchen in partnership with Allrecipes for your listening pleasure.

​Crank it up!

Help yourself to Mardi Gras beads
But this year we were ready to mix it up and add a little twist to keep things interesting: a Mardi Gras/Holiday Costumes theme. I’m happy to say our guests embraced the concept, unleashing boundless creativity and a flair for the dramatic -- from the Statue of Liberty right down to the littlest snow leopard. Awesome costumes! Festive attire for days! Extreme silliness straight ahead! Even the staunchest anti-costume attendees managed to cut loose a little with the Mardi Gras beads placed strategically around the house, available for the taking. 

Christmas Cookie and Festival of Lights

​​In case you’re wondering, I was the Christmas Cookie and Ilise was Festival of Lights with a bright strand of LED lights woven through a jester’s hat in Mardi Gras colors. It was truly something to behold!

Take a look at some of the great costumes and happy party people.

​Click on the photos below to enlarge them and read the captions.


What did we serve? What didn’t we. Here’s the menu with links to the recipes that've already been posted on Entertain the Possibilities. Be on the lookout for additional party recipes coming in the days ahead.

Specialty cocktail: Hurricane-style Rum Punch

Main courses & sides:
  • Jambalaya with Chicken and Andouille Sausage
  • Vegetable Gumbo
  • Muffuletta Sandwiches – 2 kinds, meat and roasted veggies
  • Maque Choux – traditional Creole corn dish
  • Basil-Garlic Green Beans
  • Pimento Cheese Spread & Hummus – served with crudité and crackers
  • Bread Basket: Jalapeno-Corn Mini Muffins; Baby Buttermilk Biscuits

Desserts:
  • New Orleans-style Bread Pudding with Whisky Hard Sauce
  • Sweet Potato Pie Bars
  • Pecan Pie
  • Rugelach – 2 kinds, apricot and raspberry, some with walnuts
  • Mondel bread – 2 kinds, plain and chocolate chip
  • Chocolate Covered Peanut Butter Balls
  • Carmelitas
  • Dark Cocoa Brownies
  • Blondies with Chocolate Chunks, Cherries and Pecans
  • Chocolate Bark – 2 kinds, peppermint and cranberry-pistachio-lime
  • Clementines and grapes – for healthy eating doncha know

​Let’s just say – no one went hungry. In fact, many went home with leftovers!

My holiday wish to you – may you enjoy as much laughter, love, joy and community as we had that evening – during this festive season and always. 

Now how about a few more party photos! As always, please click the photos to enlarge them and read the captions.
3 Comments

Drinkies: Rum Punch

12/15/2016

1 Comment

 
Rum Punch
New Orleans style Hurricane Rum Punch
The Occasion: Seasonal parties – Christmas, Hanukkah, Winter Solstice, you name it. Also Friday night parties or anytime at all. You name it.

Why This Works: Punch is great for parties. One big batch of something delicious vs making individual cocktails for your guests. Um yes, that’ll work.

For big parties we usually set up a self-serve bar with a good mix of wine, beer, soft drinks, and spirits AND a big urn of the ‘specialty drink’ du jour. Plus a coffee bar. Drink responsibly, you know.

The Specifics/Subtext: We held our annual holiday open house last weekend – look for a party recap coming soon – incriminating photos galore! The theme was New Orleans Mardi Gras + Christmas & Hanukkah + Costumes. So naturally the specialty cocktail was a New Orleans style Hurricane done as a punch. Tasty tasty rum punch.

Of course you can make these drinks one at a time. Or make a pitcher to keep in the fridge over the weekend. Totally up to you. Cheers to having options! 

Rum Punch
Click the photo to take a closer look at the carousel tumblers at Entertaining Vintage
The Playlist: Rock You Like a Hurricane by 80s hair metal band Scorpions. Turn it up loud.

The Verdict: Really good! The giant vat of punch we served at the open house was gone within a few hours and enjoyed by all who partook of it. You can dial the drink’s potency up or down as desired by adding more or less liquor and/or mixers. This rum punch goes down very easily so be sure to serve it over ice and use caution.  

Click on the photos to enlarge them and read the photos.
Printable Recipe- Hurricane Rum Punch
File Size: 556 kb
File Type: pdf
Download File

Hurricane Rum Punch
Recipe: Ilise Goldberg adapted a recipe from Jen Welch

Yield: 8 servings

INGREDIENTS:
  • 16 oz Berry Punch
  • 16 oz Lemonade
  • 20 oz Orange/Pineapple Juice
  • 4 oz Orange rum
  • 6 oz Spiced run
  • 8 oz Amber rum
 
DIRECTIONS:
  • Mix all ingredients together in a pitcher.
  • Pour into serving glasses with ice. 
  • Garnish each glass with pineapple or orange AND a cherry.
Rum Punch
A trio of tasty rum punch cocktails
1 Comment

Sweet Bites: Carmelitas

12/13/2016

0 Comments

 
Carmelitas
Carmelitas -- delicious bar cookies with caramel, chocolate, and a crumbly, oat-y crust and topping
The Occasion: Tis the holiday season and everywhere you look there’s a bake sale at church or a cookie exchange or an office potluck. Sign up for dessert and bring a batch of these. You’ll be very popular, guaranteed.

Why This Recipe: We hosted our annual holiday open house last weekend and Make Ahead was our strategy for addressing most of the sweets table. Bar cookies hold up well to a few weeks/months in the freezer, and this is an especially nice version because it’s got chocolate AND caramel in there underneath a crumbly baked topping. Yum!
The Playlist: Because Rosalita sounds like Carmelita. And it’s always a good time for Bruuuuuuuce!
The Verdict: Party guests raved about the Carmelitas and the hostesses are pretty pleased too. There are a lot of flavors and textures going on in these tasty bars – and all without nuts which can be helpful when baking for a group and taking care about food allergies.     

This is easy but not fast. Read the whole recipe before getting started. Each layer needs time to cook and cool before adding the next one. Quite do-able, but don't make the same mistake we did by starting late in the day. 

Click on the photos to enlarge them and read the captions.
Printable Recipe- Carmelitas
File Size: 525 kb
File Type: pdf
Download File

Carmelitas
Recipe source: Lulu The Baker
 
INGREDIENTS:
  • 32 caramel squares, unwrapped (9 oz)
  • 1/2 cup heavy cream
  • 3/4 cup butter, melted
  • 3/4 cup brown sugar, packed                                    
  • 1 cup flour
  • 1 cup rolled oats
  • 1 teaspoon baking soda
  • 6 ounces semisweet chocolate chips

DIRECTIONS:
  • Preheat oven to 350 degrees.
  • Combine caramels and cream in a small saucepan over low heat. Stir until completely smooth; set aside.
  • In a separate bowl, combine melted butter, brown sugar, flour, oats, and baking soda. Pat half of the oatmeal mixture into the bottom of an 8×8″ pan. Bake at 350 degrees for 10 minutes.
  • Remove pan from oven and sprinkle chocolate chips over crust. Pour caramel mixture over chocolate chips. Crumble remaining oatmeal mixture over caramel.
  • Return to oven and bake an additional 15-20 minutes, until the edges are lightly browned.
  • Remove from oven and cool completely before cutting.

*A stint in the fridge will help them cool off if you’re pinched for time. They shouldn’t be served cold, but all of that molten caramel takes a long time to cool down. They should be stored and served at room temperature.

**To make a 9×13″ version, simply double the amounts.

​***If you want to use homemade or store-bought caramel sauce in place of the caramel/cream mixture, use 1 1/4 cups of sauce.
Carmelitas
Let's get a close-up look at this decadent treat -- caramel, and chocolate, and crumbly bits -- oh my!
0 Comments

Drinkies: The Sugar Plum Cocktail

12/8/2016

1 Comment

 
The Sugar Plum Cocktail
Sugar Plum Cocktail on a Snowy Day
How does the classic Christmas poem by Clement Clarke Moore go? Ah yes: 
The stockings were hung by the chimney with care,  
In hopes that St. Nicholas soon would be there; 
The children were nestled all snug in their beds,
​
While visions of sugar-plums danced in their heads  

I think the modern version goes something like this: Enjoy a few of these delightful concoctions and you just might have visions and dance on the bed in your stocking feet with your new BFF Nicky.

This is a seriously delicious cocktail that is just unusual enough to get your attention, and exciting enough to request a refill.

Planning any parties this festive holiday season? The Sugar Plum Cocktail would be an excellent choice of refreshment to treat your nearest and dearest.

Bar chef Ilise was forward-thinking enough in September to make plum-infused simple syrup and freeze it into ice cubes for easy use all year round. (This method works well with many different fruits and fresh herbs.) But for the rest of us who would never plan that far ahead (sheepishly raises hand) she has included an option to use plum jam instead. It’s just as delicious.

​Let’s have some appropriate tunage to accompany the photos and recipe, shall we? We shall.
As a wee person I danced in The Nutcracker, and as a young theatre professional I worked on the tech crew for countless performances of The Nutcracker, so you can say that I’ve heard The Dance of the Sugarplum Fairy more than a few times.  This version here – by Take 6 – is one of my favorites. Give a listen and let me know what you think!
Click on the photos to enlarge them and read the captions.
Printable Recipe- Sugar Plum Cocktail
File Size: 668 kb
File Type: pdf
Download File

The Sugar Plum Cocktail
Recipe by Ilise Goldberg

Yield: One cocktail

INGREDIENTS:
  • 1 1/2 oz Vodka
  • 1 1/2 oz Plum Simple Syrup (or plum jam)
  • 1/4 oz St. Germaine Liqueur
  • 1/4 oz Ginger Liqueur such as Domaine de Canton
  • 1/4 oz Lemon Juice
  • Colored sugar to rim the martini glasses (purple if you can find it, regular sugar works too)
  • Sugar plums* for garnish
* Sugar plums are a type of gummy candy, found at specialty food stores or online.

DIRECTIONS:
  • In a cocktail shaker combine all ingredients with ice.  Shake well. 
  • Strain into chilled martini glass rimmed with sugar.
  • Garnish with sugar plums.   
  • In the non-holiday season just garnish with a fresh plum wedge and no need to rim the martini glass with sugar (unless you want to).
 
Note: This recipe was originally made after I had made a big batch of plum simple syrup in early fall.  If you want to make this recipe and don’t have any plum simple syrup handy or it’s not plum season, use plum jam/preserves instead.
 
Plum Simple Syrup:
  • 2 pound plums cut in quarters (any variety or a combination of varieties)
  • 1 Cup of Water
  • 1/2 Cup of Sugar
  • Combine the water and sugar in a pan over high heat until the sugar dissolves. 
  • Add the plum chunks and bring to a boil. Reduce the heat to low, and let it simmer for 15 minutes.
  • Once the fruit is nice and tender use a potato masher and mash the fruit to release as much juice as possible. 
  • Remove the mixture from heat and allow it to cool completely.
  • Strain the syrup into a container, and store it for up to two weeks in the refrigerator. 
  • If making far in advance the simple syrup freezes well.  

Pair of Sugar Plum Cocktails on a Snowy Day
Cheers!
1 Comment

Sweet Bites: Dark Cocoa Brownies to Die For

12/5/2016

1 Comment

 
Dark Cocoa Brownies
The Occasion: A little Me-time. Also feed the family, treats for the loved ones, yada yada. But as they say on the airplanes, address your own needs first (safety, oxygen mask, whatever – you get the picture). You need to carve out a little time for yourself to sit a spell with this fudgy, dark brownie and a cup of coffee, glass of milk, name your poison you’re going to want something to wash this down.

Why This Recipe: It comes from Deb at Smitten Kitchen, my first fave food blog. She’s especially passionate about baked goods, as is her fandom who love these brownies a LOT.

The Subtext: We have been preparing for our annual holiday open house for weeks now, baking and freezing all sorts of goodies. Brownies and bar cookies are very well-suited for the make ahead and freeze treatment. 
Dark Cocoa Brownies
Take a closer look at the cute vintage glass (part of a set) at Entertaining Vintage – just click the photo
The Playlist: Please enjoy a couple of sweet little ditties from Carsie Blanton + Jonny P. Click on the artists’ names to visit their websites and learn more about them.

The Verdict: I’ve eaten a lot of brownies in my day, and I think we know they are not all created equal. These dark and lovely beauties – unadulterated by nuts or chips or anything else – absolutely ring the bell. Super-rich and fudgy, there’s not a lot of flour in there so it’s got a torte-like texture. Mmm-hmm. That’s what I’m talking about. Perfect for that Me-time we discussed earlier – when you deserve a little indulgence, this will do the job. 

Click on the photos to enlarge them and read the captions.
Printable Recipe- Best Cocoa Brownies
File Size: 451 kb
File Type: pdf
Download File

Best Cocoa Brownies
Recipe source: Smitten Kitchen originally from Alice Medrich’s Bittersweet cookbook
 
INGREDIENTS:
  • 10 tablespoons (140 grams) unsalted butter
  • 1 1/4 cups (250 grams) granulated sugar
  • 3/4 cup plus 2 tablespoons (65 grams, may vary by brands) unsweetened cocoa powder (natural or Dutch-process)
  • 1/4 teaspoon salt (or a heaping 1/4 teaspoon flaky salt, as I used)
  • 1/2 teaspoon pure vanilla extract
  • 2 large eggs, cold
  • 1/2 cup (65 grams) all-purpose flour
  • 2/3 cup (75 grams) walnut or pecan pieces (optional)

DIRECTIONS:
  • Position a rack in the lower third of the oven and preheat the oven to 325°F.
  • Line the bottom and sides of an 8×8-inch square baking pan with parchment paper or foil, leaving an overhang on two opposite sides.
  • Combine the butter, sugar, cocoa, and salt in a medium heatproof bowl and melt them together in the microwave. Use short 20-second burst, then stir, and heat again until butter is melted.
  • Set the bowl aside briefly until the mixture is only warm, not hot. It looks fairly gritty at this point, but don’t worry — it smooths out once the eggs and flour are added.
  • Stir in the vanilla with a wooden spoon.
  • Add the eggs one at a time, stirring vigorously after each one.
  • When the batter looks thick, shiny, and well blended, add the flour and stir until you cannot see it any longer, then beat vigorously for 40 strokes with the wooden spoon or a rubber spatula.
  • Stir in the nuts, if using.
  • Spread evenly in the lined pan.
  • Bake until a toothpick plunged into the center emerges slightly moist with batter, about 30 minutes. (Smitten Kitchen says: put them in the fridge or freezer for a while; it helps firm them up to cut with clean lines.)
  • Lift up the ends of the parchment or foil liner, and transfer the brownies to a cutting board. Cut into 16 or 25 squares.
Make ahead note: Brownies will freeze well and keep for two months. Freeze as a full block; do not cut into pieces. Wrap brownie block in plastic wrap (two layers), then aluminum foil. Place the whole thing in a freezer storage bag. 
Dark Cocoa Brownies
Dark Cocoa Brownies to die for! Dead.
1 Comment

Pimento Cheese Spread - Perfect for Parties!

12/2/2016

2 Comments

 
Pimento Cheese Spread
The Occasion: This Southern classic takes the place of honor as an awesome appetizer at your next party – even if it’s a party for one in front of the TV.

The Subtext: Ilise and I will be hosting our annual holiday open house soon and have been testing recipes all along. This super-delicious cheese dip/spread is going to replace the traditional cheese plate this year. Change is good!

Why This Recipe: Every Southern chef, home cook, and Mamaw has their own special recipe for pimento cheese but at the core is a simple foundation: shredded cheddar, chopped pimentos, cream cheese, and mayonnaise.

This recipe comes from James Beard Award-winning South Carolina chef Sean Brock who has dedicated his culinary career to preserving Southern food traditions while adding a few contemporary touches of his own.
Pimento Cheese Spread
Take a closer look at the vintage glass bowl (part of a set) at Entertaining Vintage
The Playlist: Southern Drawl by Jon Langston. Click the artist’s name to visit his website and learn more.
The Verdict: I do not know if they had this soul-satisfying cheese spread in mind when the phrase “Southern comfort” was coined but boy howdy this is my new definition of comfort food. To my taste, Chef Brock’s addition of chopped pickles is inspired, adding a nice vinegary layer to this luscious dip. It is great on crackers, with veggie dippers, in a sandwich, maybe even put a dollop on top of your next home-cooked burger. Wow!

Click on the photos to enlarge them and read the captions.
Printable Recipe- Pimento Cheese Spread
File Size: 537 kb
File Type: pdf
Download File

Pimento Cheese Spread
Recipe source: Sean Brock for Garden and Gun
 
INGREDIENTS:
  • 3 large pimento peppers (about 12 oz.)
  • 4 oz. cream cheese, at room temperature
  • ½ cup mayonnaise, preferably Duke’s
  • ½ tsp. vinegar-based hot sauce, such as Tabasco
  • ½ tsp. kosher salt
  • ¼ tsp. sugar
  • ⅛ tsp. cayenne pepper
  • ⅛ tsp. freshly ground white pepper
  • ⅛ tsp. smoked paprika
  • ¼ cup pickled ramps, chopped, plus ½ cup of the brine (if you can't find ramps, you can substitute finely chopped bread-and-butter pickles and brine)
  • 1 lb. sharp cheddar cheese, grated on the large holes of a box grater 

DIRECTIONS:
  • Roast the peppers over an open flame on a gas stovetop, one pepper at a time, on the prongs of a carving fork. Or place on a baking sheet and roast under a hot broiler. In either case, turn the peppers to blister all sides. Then transfer the peppers to a bowl and cover the bowl with plastic wrap. Set aside to let the peppers steam until cool enough to handle.
  • Carefully peel the blackened skin off each pepper. Cut the peppers lengthwise in half, open out flat on a cutting board, and carefully scrape away all the seeds and membrane. Dice the peppers. 
  • Put the cream cheese in a medium bowl and beat it with a wooden spoon until softened. Add the mayonnaise and mix well. Add the hot sauce, salt, sugar, cayenne pepper, white pepper, and smoked paprika and stir to blend. Add the pickles, brine, and cheddar cheese and stir again. Fold in the diced pimentos. 
  • Cover and refrigerate until ready to serve. Tightly covered, the pimento cheese will keep for up to 3 days in the refrigerator. 
Note: For creamier pimento cheese, combine all of the ingredients in the bowl of a stand mixer fitted with the paddle attachment and beat on medium speed for 2 minutes. 
2 Comments
    When home cooking becomes a special occasion - Recipes, playlists, table tips and more
    Picture

    ​
    Entertaining Vintage

    Vintage treasures for the kitchen, home, collectibles, and gifts

    Categories

    All
    Afternoon Dance Break
    Birthday Greetings
    Cookbook Road Test
    Cool Tunes
    Drinks
    Entertaining Vintage
    Fish
    Kitchen Reno
    Kitchen Tips
    National Days
    Party Planning
    Pop Culture
    Recipe
    Savory Bites
    Supper Club
    Sweet Bites
    The Arts
    Travel
    TV
    Video

    Archives

    May 2020
    April 2020
    March 2020
    August 2019
    June 2019
    May 2019
    April 2019
    March 2019
    February 2019
    January 2019
    December 2018
    November 2018
    October 2018
    September 2018
    August 2018
    July 2018
    June 2018
    May 2018
    April 2018
    March 2018
    February 2018
    January 2018
    December 2017
    November 2017
    October 2017
    September 2017
    August 2017
    July 2017
    June 2017
    May 2017
    April 2017
    March 2017
    February 2017
    January 2017
    December 2016
    November 2016
    October 2016
    September 2016
    August 2016
    July 2016
    June 2016
    May 2016
    April 2016
    March 2016
    February 2016
    January 2016
    December 2015
    November 2015
    October 2015
    September 2015
    August 2015
    July 2015
    June 2015
    May 2015
    April 2015

    RSS Feed

    Subscribe to our mailing list

    * indicates required
Proudly powered by Weebly